
| 일 | 월 | 화 | 수 | 목 | 금 | 토 |
|---|---|---|---|---|---|---|
| 1 | 2 | 3 | ||||
| 4 | 5 | 6 | 7 | 8 | 9 | 10 |
| 11 | 12 | 13 | 14 | 15 | 16 | 17 |
| 18 | 19 | 20 | 21 | 22 | 23 | 24 |
| 25 | 26 | 27 | 28 | 29 | 30 | 31 |
- nosql
- 운영체제
- websocket
- redis
- DFS
- 프로그래머스
- 백준
- CSS
- OS
- HTML
- 영속성 컨텍스트
- 플로이드-워셜 알고리즘
- Data structure
- Docker
- spring
- javascript
- jpa
- Algorithm
- 트랜잭션
- PYTHON
- java
- db
- 데이터베이스
- CS
- It
- 알고리즘
- 자료구조
- 완전탐색
- mysql
- BFS
- Today
- Total
If at first you don't succeed, try again
[개발] STOMP를 사용한 config 구현 본문
* 개요
지난번에 순수 websocket을 기반으로 채팅을 구현했었는데, 이번엔 websocket 기반 위에서 동작하는 STOMP를 이용하여 채팅 config 구현을 하고자 한다.
* STOMP란?
STOMP는 메시지 전송을 위한 간단한 텍스트 기반 프로토콜이다.
주로 WebSocket 위에서 동작하는 메시징 프로토콜로 사용된다.
* STOMP가 Websocket 위에서 동작하는 이유
Websocket은 클라이언트와 서버가 한 번 연결을 맺으면 실시간으로 데이터를 주고받을 수 있다.
그리고 별도의 메시지 형식 정의가 없다.
즉, websocket은 연결을 제공할 뿐, 어떤 데이터를 어떻게 주고 받을지에 대한 규칙이 없다.
STOMP는 websocket 위에서 메시지를 어떻게 다룰지 정해주는 역할을 한다.
* 그래서 STOMP를 언제 쓰는가?
STOMP는 websocket과 다르게 메시지 라우팅 기능이 존재하는데, 주제(topic) 및 큐(queue)를 활용한 메시지 브로커 방식을 사용한다.
그리고 메시지 형식을 지정할 수 있다.(ex. JSON, XML, String...)
subscribe, send 등의 명령어를 지원하기에 채팅 시스템, 실시간 알림, 대규모 메시징 서비스에 적합하다.
* StompWebsocketConfig 클래스 생성
WebSocketMessageBrokerConfigurer를 구현한 StompWebsocketConfig 클래스를 생성한다.
WebSocketMessageBrokerConfigurer는 STOMP 프로토콜을 기반으로 WebSocket 메시지 브로커를 설정하고, 구성할 때 사용한다.
import lombok.RequiredArgsConstructor;
import org.springframework.context.annotation.Configuration;
import org.springframework.messaging.simp.config.ChannelRegistration;
import org.springframework.messaging.simp.config.MessageBrokerRegistry;
import org.springframework.web.socket.config.annotation.EnableWebSocketMessageBroker;
import org.springframework.web.socket.config.annotation.StompEndpointRegistry;
import org.springframework.web.socket.config.annotation.WebSocketMessageBrokerConfigurer;

@Configuration
@EnableWebSocketMessageBroker
@RequiredArgsConstructor
public class StompWebSocketConfig implements WebSocketMessageBrokerConfigurer {
    private final StompHandler stompHandler;

    @Override
    public void registerStompEndpoints(StompEndpointRegistry registry) {
        registry.addEndpoint("/connect")
                .setAllowedOrigins("http://localhost:3000")
                .withSockJS();
    }

    @Override
    public void configureMessageBroker(MessageBrokerRegistry registry) {
        registry.setApplicationDestinationPrefixes("/publish");
        registry.enableSimpleBroker("/topic");
    }

    @Override
    public void configureClientInboundChannel(ChannelRegistration registration) {
        registration.interceptors(stompHandler);
    }
}
1. registerStompEndpoints 메서드
우선 최초 연결을 맺기 위한 endpoint를 정의한다.
WebSocketMessageBrokerConfigurer의 registerStompEndpoints 메서드를 오버라이딩한다.
클라이언트가 "/connect" 경로로 websocket에 연결할 수 있도록 하였다.
프론트 쪽에서는 "ws://서버주소/connect"로 접속하면 websocket 연결이 이루어질 것이다.
그리고 cors 설정을 하였는데, "http://localhost:3000"을 허용하여 포트 3000에서 websocket 서버로 요청을 보낼 수 있도록 허용하였다.
마지막으로 withSockJS()를 통해서 SockJS를 활성화한다.
SockJS는 ws:// 가 아니라 http:// 엔드포인트를 사용할 수 있게 해주는 라이브러리다.
사용하는 이유는 브라우저에 따라 websocket을 지원하지 않을 수도 있기 때문이다.
이를 사용하면 모든 환경에서 websocket 연결이 가능해진다.
2. configureMessageBroker 메서드
MessageBrokerRegistry를 통해 메시지를 발행하고 구동하기 위한 url 패턴(prefix)를 정의한다.
그리고 이 클래스는 simplebroker라고 불리고, 메시지를 특정 topic에 연결해주는 브로커 역할을 수행한다.
클라이언트가 서버로 메시지를 보낼 때 사용하는 prefix를 설정해야 하는데,
"/publish"로 시작하는 주소로 메시지를 전송하게 하였다.
publish로 시작하는 url 패턴으로 메시지가 발행되면 @Controller 객체의 @MessageMapping 메서드로 라우팅될 것이다.
브로커 설정도 해주었는데, 클라이언트가 구독(subscribe)할 때 사용할 메시지 브로커의 경로를 설정하였다.
경로는 "/topic"이다.
3. configureClientInboundChannel 메서드
클라이언트가 서버로 메시지를 전송하고자 할 때 가로채는 interceptor를 적용하였다.
적용한 이유는 메시지를 보낼 때, 사용자 인증이 되어있어야 하기 때문이다.
로그인을 하지 않았는데도 채팅이 가능하다면 웃기지 않겠는가.
따라서 interceptor를 통해 토큰 등을 검증할 수 있게 하였다.
* StompHandler 클래스 생성
ChannelInterceptor를 구현한 StompHandler 클래스를 생성한다.
ChannelInterceptor는 클라이언트가 서버로 전송하는 STOMP 메시지(CONNECT, SUBSCRIBE, SEND, DISCONNECT 등)를 가로채는 인터셉터이다.
import io.jsonwebtoken.Claims;
import io.jsonwebtoken.Jwts;
import org.springframework.beans.factory.annotation.Value;
import org.springframework.messaging.Message;
import org.springframework.messaging.MessageChannel;
import org.springframework.messaging.simp.stomp.StompCommand;
import org.springframework.messaging.simp.stomp.StompHeaderAccessor;
import org.springframework.messaging.support.ChannelInterceptor;
import org.springframework.stereotype.Component;

@Component
public class StompHandler implements ChannelInterceptor {
    @Value("${jwt.secretKey}")
    private String secretKey;

    @Override
    public Message<?> preSend(Message<?> message, MessageChannel channel) {
        final StompHeaderAccessor accessor = StompHeaderAccessor.wrap(message);

        if(StompCommand.CONNECT == accessor.getCommand()) {
            String bearerToken = accessor.getFirstNativeHeader("Authorization");
            String token = bearerToken.substring(7);
            // 토큰 검증
            Claims claims = Jwts.parserBuilder()
                    .setSigningKey(secretKey)
                    .build()
                    .parseClaimsJws(token)
                    .getBody();
        }

        return message;
    }
}
application.yml에 설정했던 jwt의 secretKey를 @Value 어노테이션을 통해 매핑한다.
ChannelInterceptor의 preSend 메서드를 오버라이딩한다.
- preSend 메서드
메시지를 보내기 전 토큰 인증을 진행한다.
먼저 StompHeaderAccessor를 이용하여 메시지의 헤더 정도를 가져온다.
STOMP 메시지를 쉽게 가져올 수 있도록 래핑한다.
그 후 STOMP가 connect된 경우에 토큰 검증을 진행하므로 if문으로 감싸준다.
STOMP 메시지의 헤더에서 Authorization 값을 가져오고 substring을 통해 실제 토큰 값을 추출한다.
그리고 JWT 라이브러리를 사용하여 토큰을 검증한다.
JWT의 클레임 정보(사용자 ID, 권한 정보 등)를 가져오는데, 토큰이 유효하지 않거나 변조되었을 경우 예외가 발생할 것이다.
* ChatMessageReqDto 클래스 생성
메시지를 요청하고 전달하기 위한 DTO 클래스를 생성한다.
import lombok.AllArgsConstructor;
import lombok.Data;
import lombok.NoArgsConstructor;

@Data
@AllArgsConstructor
@NoArgsConstructor
public class ChatMessageReqDto {
    private String message;
    private String senderEmail;
}
전달하는 필드는 message와 유저의 email이다.
* StompController 클래스 생성
import com.example.chatserver.chat.dto.ChatMessageReqDto;
import lombok.RequiredArgsConstructor;
import org.springframework.messaging.handler.annotation.DestinationVariable;
import org.springframework.messaging.handler.annotation.MessageMapping;
import org.springframework.messaging.simp.SimpMessageSendingOperations;
import org.springframework.stereotype.Controller;

@Controller
@RequiredArgsConstructor
public class StompController {
    private final SimpMessageSendingOperations messageTemplate;

    @MessageMapping("/{roomId}")
    public void sendMessage(@DestinationVariable Long roomId, ChatMessageReqDto chatMessageReqDto) {
        System.out.println(chatMessageReqDto.getMessage());
        messageTemplate.convertAndSend("/topic/" + roomId, chatMessageReqDto.getMessage());
    }
}
MessageMapping과 SimpMessageSendingOperations 클래스의 convertAndSend 기능을 활용해서 송신, 수신 메서드를 분리했다.
- sendMessage 메서드
클라이언트가 "/publish/{roomId}" 경로로 메시지를 보내면 @MessageMapping이 실행이 될 것이다.
그리고 roomId값이 @DestinationVariable로 자동 매핑될 것이다!
즉, @MessageMapping은 클라이언트가 특정 채팅방 ID에 메시지를 보낼 수 있도록 설정해준다.
println으로 서버에서 수신한 메시지를 로그로 출력한다.
SimpMessageSendingOperations 클래스의 convertAndSend를 사용하여 "/topic/{roomId}"을 구독한 모든 클라이언트들에게 dto에서 받은 메시지를 전달한다.
* EventListener 클래스 생성
Spring과 STOMP는 기본적으로 세션 관리를 자동으로 처리한다.
클라이언트가 /connect 엔드포인트를 통해 연결될 때 세션이 생성되고,
연결을 종료하거나 타임아웃이 발생하면 세션이 삭제된다.
세션 관련하여 추가적인 작업이 필요한 경우 EventListener를 생성하는데,
나는 connect / disconnect 이벤트를 기록하고, 연결된 세션 수를 로깅하기 위해 클래스를 생성했다.
import org.springframework.context.event.EventListener;
import org.springframework.messaging.simp.stomp.StompHeaderAccessor;
import org.springframework.stereotype.Component;
import org.springframework.web.socket.messaging.SessionConnectEvent;
import org.springframework.web.socket.messaging.SessionDisconnectEvent;

import java.util.Set;
import java.util.concurrent.ConcurrentHashMap;

@Component
public class StompEventListener {
    private final Set<String> sessions = ConcurrentHashMap.newKeySet();

    @EventListener
    public void connectHandle(SessionConnectEvent event) {
        StompHeaderAccessor accessor = StompHeaderAccessor.wrap(event.getMessage());
        sessions.add(accessor.getSessionId());

        System.out.println("connect sessionId" + accessor.getSessionId());
        System.out.println("total session : " + sessions.size());
    }

    @EventListener
    public void disconnectHandle(SessionDisconnectEvent event) {
        StompHeaderAccessor accessor = StompHeaderAccessor.wrap(event.getMessage());
        sessions.remove(accessor.getSessionId());

        System.out.println("disconnect sessionId : " + accessor.getSessionId());
        System.out.println("total session : " + sessions.size());
    }
}
우선 session을 담을 수 있는 set 자료구조를 활용했는데, thread-safe한 ConcurrentHashMap을 사용했다.
동시에 여러 클라이언트가 연결되더라도 안정적으로 동작할 수 있기 때문이다.
1. connectHandle() 메서드
connectHandle() 메서드는 SessionConnectEvent가 발생하면 실행된다.
즉, 클라이언트가 STOMP를 통해 서버를 연결할 때 발생한다.
StompHeaderAccessor를 통해 STOMP 메시지 헤더를 추출한다.
그 후 sessions에 sessionId를 담는다.
그리고 연결되어 있는 sessionId를 출력하고, 현재 연결되어 있는 세션 개수를 출력한다.
2. disconnectHandle() 메서드
disconnectHandle() 메서드는 클라이언트가 STOMP 연결을 종료하거나 강제 종료되면 실행된다.
StompHeaderAccessor를 통해 STOMP 메시지 헤더를 추출한다.
그 후 sessionId를 통해 sessions에 담겨져 있는 세션을 삭제한다.
그리고 연결이 끊긴 sessionId를 출력하고, 현재 남아있는 세션 개수를 출력한다.
* 정리
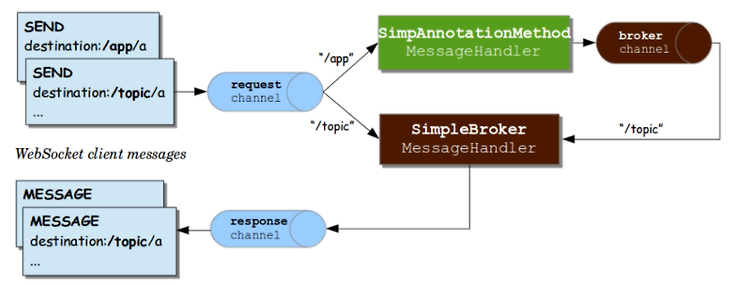
- 메시지 교환 절차
- 클라이언트에서 지정된 /app(publish)/{roodId} 경로로 메시지를 발행하면 broker에 의해서 /topic/{roomId}이라는 경로의 채널에 메시지가 전달된다.
- 동시에 /topic/{roomId}를 구독하고 있는 클라이언트에게 실시간으로 메시지가 전달된다.
- SimpAnnotationMethodMessageHandler
- 코드 상의 StompController에서 @MessageMapping과 같은 어노테이션이 선언된 메서드를 처리하는 핸들러다.
- 어노테이션을 통해 지정된 메서드로 메시지를 라우팅하는 역할을 한다.
'개발' 카테고리의 다른 글
| [개발] 순수 WebSocket으로 채팅 구현 feat.Postman (0) | 2025.03.17 |
|---|---|
| [개발] IntelliJ 윈도우 단축키 (0) | 2022.11.21 |
